Devil’s Rope

Devil’s rope – an ominous sounding moniker.  But anyone who has worked with barbed wire will tell you that it is an appropriate term for this most unforgiving ranch fixture.  Devil’s rope (AKA barbed wire) will lash out at you at the least provocation.  It will lacerate your skin just as efficiently as it rips your new blue jeans to shreds.  Want to know if someone really lives on a farm or ranch?  Just look at their hands and arms for the telltale scars that come from working with this fiendish fencing material.  No scars apparent?  Urban cowboy.  Period.

 Short section of barbed wire fence needing repair

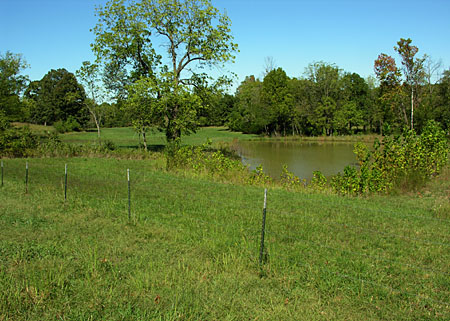
So you can appreciate the slight groan that escaped my lips as Retta informed me that a small section of barbed wire fence (seen above) needed repair.  This was a task that couldn’t wait, however.   This section of fencing keeps our horses within their grazing pasture, and out of our pond and nearby hayfield.  At best, barbed wire fencing is a safety concern around horses, but sagging, loose barbed wire is a disaster waiting to happen.  So off to work I went.

A makeshift wire caddy

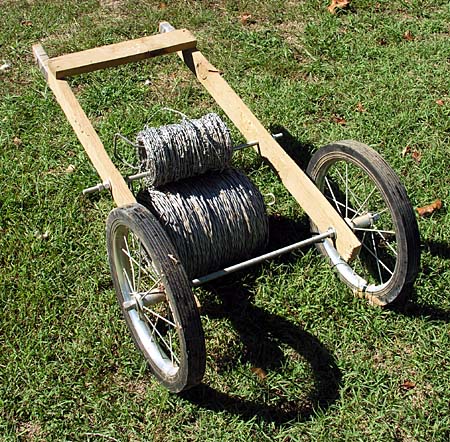
I gathered up my small collection of barbed wire fencing tools to accomplish this repair chore.   Spools of barbed wire are both heavy and unwieldy, so it is helpful to use some type of caddy to facilitate handling the spools.  Commercial caddys are available at farm & ranch stores, but since I had two solid-rubber, spoked, ball-bearing wheels laying around, I fashioned a makeshift caddy using the surplus wheels, along with some scrap lumber and a couple of pieces of threaded rod.

A few fencing tools

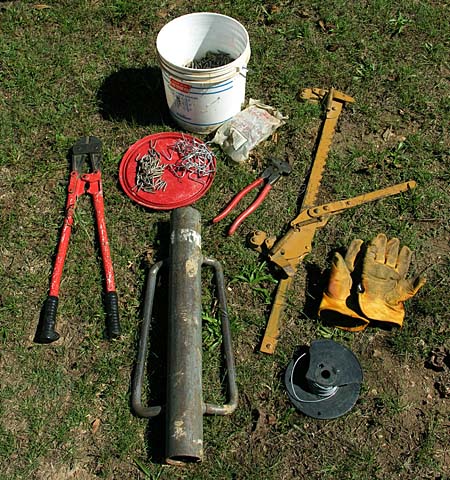
The basic tools I use are seen in this photograph.  A bolt cutter will cut through wire, nails and fencing staples easily, so it is handy to have one on hand for repair work.

The t-post driver is a heavy tool that is used to pound t-post into the ground (you can see a picture of one in action in this previous post).  I cannot tell you exactly how much mine weighs, but I can describe a magical property that all t-post drivers possess – with each successive t-post that you install, the driver gets heavier.  It will get heavier and heavier, until you can’t lift it anymore!

The yellowish device is a wire stretcher, which allows the barbed wire to be drawn up tight and firm.  The small red-handled tool is called a fencing pliers, and is very handy to have in your pocket as you make repairs.  A spool of smooth wire can be utilized in a variety of ways, as can a good assortment of fencing staples (for trees and wooden posts) and t-post clips.

Last, but certainly not least – don’t forget a stout pair of leather gloves to help protect your hands from the thousands of sharp, cunning barbs that await you on the malicious spool of wire you are about to work with.

T-post puller

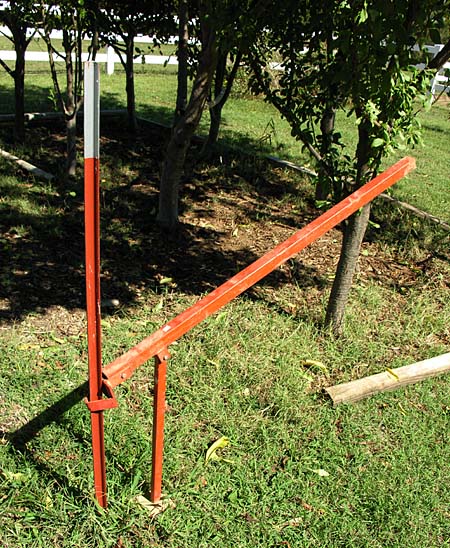
If you are careful about positioning your t-posts correctly before pounding them into the ground, you may never need to use the t-post extractor pictured above, however,  if you are like me, it will soon become a well-worn tool in your arsenal of fencing supplies.  It is a simple device that grips the nubs projecting from the t-post, and through the use of a fulcrum base, exerts tremendous upward pressure onto the t-post, thereby extracting it from the ground.  Now, you can re-position it and pound it back into the ground, where you should have put it in the first place :)

The reason I have chosen to ramble on about devil’s rope will become apparent with my next post, so check back soon…

A Nice Way to Kill Some Time

Cliff House Inn and Restaurant

A few day ago Retta and I had to leave her vehicle at the local Ford dealer for some maintenance, which was going to take a few hours for the dealership to complete.  We decided to kill the time by sightseeing in our local area, which took us south along Arkansas Scenic Byway 7, which is always a lovely and picturesque drive.

Because we hadn’t eaten anything prior to leaving the house, we thought it would be a fine idea to partake of breakfast at the Cliff House Inn, a well-known (among locals) diner located in a spectacular location along the scenic route. 

Cozy balcony overlooking the canyon

Besides good food at a fair price, the main draw of the Cliff House Inn is the view that can be seen from the dining room and from the casual balcony, shown in the photograph above.

Why travel all the way to Arizona?

The Cliff House Inn overlooks a scenic canyon, which, according to the sign above, is the deepest canyon in the Ozarks.

Wonderful view from Cliff House Inn balcony

While this canyon certainly cannot compete with the Grand Canyon in scope and drama, it is still a beautiful and very delightful sight to view while savoring a meal at the Inn.  In the photograph above, you can see the view from the balcony on a day when a typical Ozarks fog bank filled the canyon.  By the time we had finished our breakfast, the fog had dissipated, offering a clear view of the surrounding hills and valleys (hollers, as they’re known around here).

Large geode for sale at Mystic Cavern gift shop

After breakfast at the Cliffhouse Inn we traveled back toward town.  Northern Arkansas is home to over 4700 identified caves, owing to the Swiss cheese-like geology of the schist formations that form the Ozarks.  Along the way we passed one of these caves, Mystic Cavern, which operates daily guided cave tours, and so we elected to kill some more time by taking a cavern tour.  As we waited for the guided tour to begin, we browsed the gift and rock shop on the premises, where we saw this amazingly large amethyst geode from Brazil (asking price – $2700).

Formations inside Mystic Cavern

Inside Mystic Cavern you can see all of the various types of cave formations you would expect to see in such an environment.  It was well worth the time and minor effort involved for us to see this cavern.

Between breakfast at the Cliff House Inn and a tour of Mystic Cavern, we thought it was time to start heading back to town, but not without one more quick stop along the way.

Stopover at Buffalo National Scenic River

We would be crossing a section of the Buffalo National River, a scenic waterway administered by the U.S. National Park Service as the first U.S. National River.  The Buffalo River is a superb and popular river for float trips.  Besides the solitude and seclusion the river offers, the main draw is the pristine beauty of the crystal clear water gently flowing along cliffs and rock embankments like the one shown in the photograph above.  When the water is calm, it is hard to tell where the water begins and the rock ends.  We wouldn’t think of driving by the Buffalo River without stopping to take a look, which is exactly what we did before returning to town to pick up Retta’s vehicle from the dealership.

It is a very nice feeling knowing that we can enjoy such a wonderful and scenic day by just driving around the very area we choose to make our home.

A Head Shed?

Antler sheds found in fields

It is not unusual for me to find deer antler sheds around my fields and pastures, such as the ones pictured above.  I try to keep a sharp eye out for them in the fall, particularly when I am using the tractor to bush-hog our fields.  Why the sharp lookout?

Antler point extracted from tractor tire

In the photograph above there is a small tine from a deer antler that I keep on my desk.  It reminds me of the day I found it, lodged in the sidewall of a perfectly good rear tractor tire.  Seeing as this tine cost me about $400.00, I figure that it can at least serve as a paper weight for a short period of penitence.

A running gag

We find the sheds so often that I thought I would begin to mount them and display them on a wall.  I was in Bass Pro Shop in Springfield, Missouri about 5 years ago, when I saw an antler mounting kit for sale at a reasonable price.  I bought one, and soon had a pair of shed antlers proudly on display above my office desk, as you can see in the photograph above.

Something looked peculiar with the antlers I had hanging on the wall, but I couldn’t quite put my finger on what it might be.  Then, one day as I was browsing through some deer photographs, it dawned on me – the antlers hanging on my wall looked odd because I had mounted them upside down!

Oops!  I was about to climb up on my desk to retrieve the plaque with the mis-mounted antlers, when it occurred to me that it might be fun to leave them as they were, and see how long it would take until somebody noticed the error in my faulty craftsmanship.  To date (about 5 years now) no one has said a thing.  I wonder how long this streak will run?

This mistake could have been avoided if only the antlers appeared in my pastures and fields just like the ones I found today –

Today’s find while doing groundskeeping chores

I ran across this specimen as I was performing a few grounds keeping chores today.  You can clearly see the correct orientation of the antlers relative to the skull on this young buck.  There is no way even a dummy like me could botch this up ;)

Teeth are still sharp

I am surmising that this buck was relatively young, as there were no missing teeth, and the teeth looked to be sharp and undamaged.  Various other skeletal remains were located in the vicinity of this skull.  Perhaps he was brought down by a pack of coyotes, and then the carcass picked clean by vultures and other critters.