Adirondack Loveseat Project

UPDATE: The loveseat plans and guidance can be found HERE

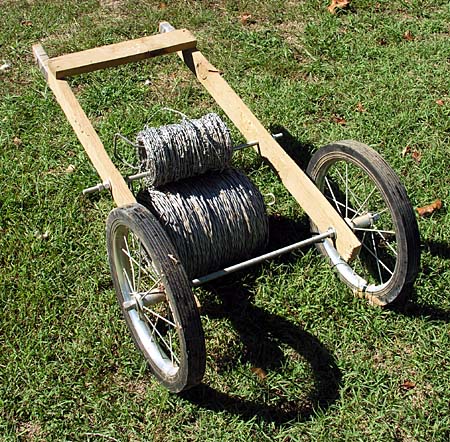
You may recall a previous post wherein I declared a goal of erecting 100 bluebird nesting boxes around our property.  The progress on that project has been satisfactory.  To date, I have built 65 nesting boxes:  50 have been erected along our trails, 3 were given to others, and 12 remain in my shop, awaiting my ambition to pound more t-posts into the ground.

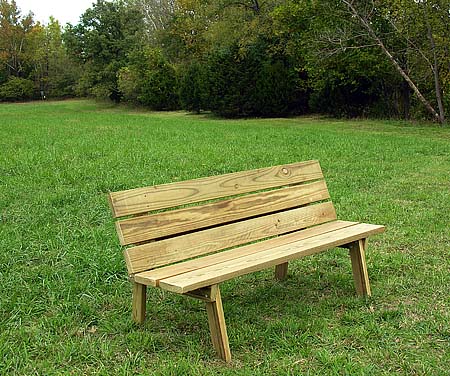
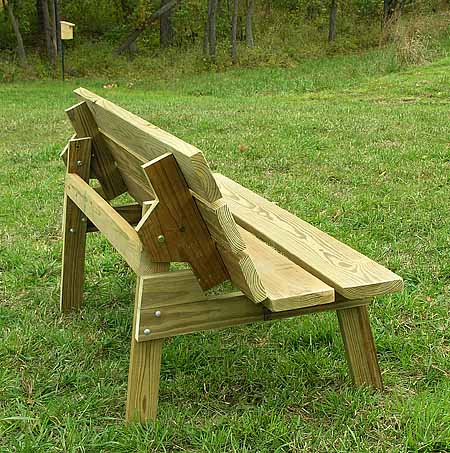
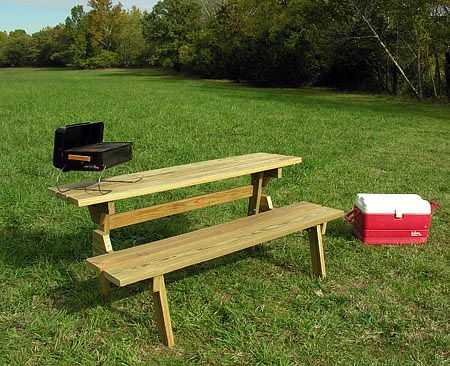
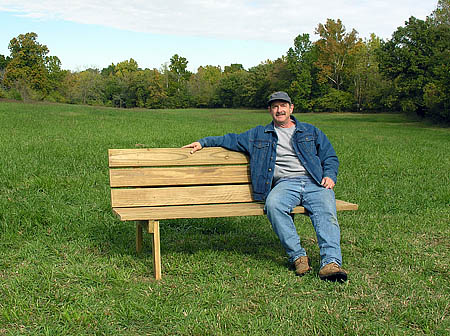
Since then, I have taken a short break from building nesting boxes in order to complete a couple of other quick projects.  First, there was the benchtable, the subject of my last post.  And now, I have just finished this Adirondack style love seat.

Adirondack style loveseat

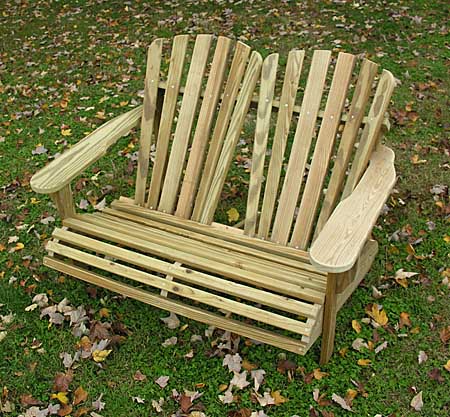
Well, it really isn’t finished, because to truly be called finished, I must apply some kind of finish to the love seat – then it will be, quite literally,  finished.  But it’s close enough.

I intended to build this love seat from plans obtained from a book Retta purchased some time ago.  After buying the necessary materials for the project, the next step was the preparation of the templates I would use to produce uniform, accurate parts.  It turns out the author of the book, or the editor, or both, did not check the construction plans for accuracy and/or completeness.  It soon became apparent that many critical dimensions and cutting angles were omitted from the plans.

Contoured seat bottom of Adirondack style loveseat

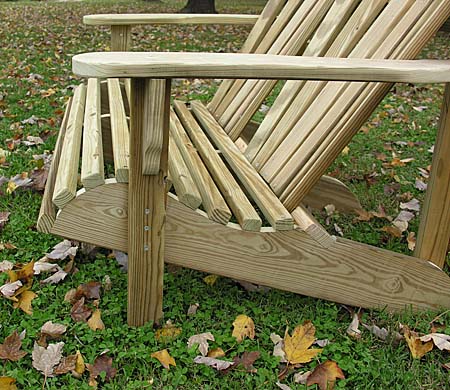
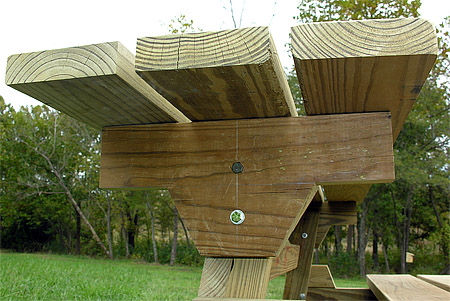
Determined to build this love seat, I pressed forward, figuring (correctly, as it turned out) the worst that could happen would be a little wasted time and lumber.  The photograph above shows the contoured seat bottom assembly that had to be built, but because the plans offered little assistance, a lot of guess work (and wasted lumber) went into building this part of the seat.

Rear of Adirondack style loveseat

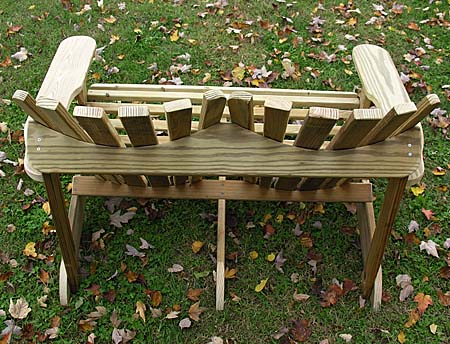
The love seat is made from 1″ stock (5/4 x 6″ pressure treated deck boards), and feels quite sturdy.  It is designed with a series of three seat supports and substantial bracing, as you can see from the picture above.

Contoured loveseat back slats

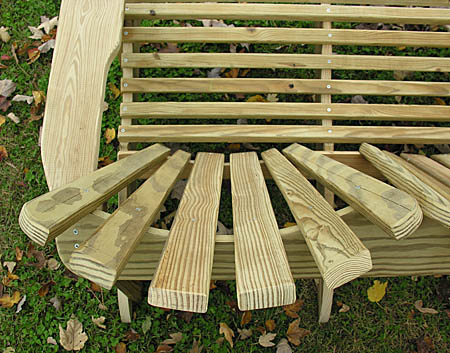
The reason I decided to build this seat, even though the plans were deficient, was that the design promised to be extremely comfortable, with the contoured seat bottom that I mention before, as well as the contoured seat back, which is evident in the photograph above.

Even though I spent a lot of extra time, and wasted some lumber experimenting in order to get the seat angles just right, the project turned out to be well worth the effort.  This is one of those pieces that, once seated, you just don’t want to get up out of, due to it’s very comfortable design.  Now that I have a working sample in front of me, I will build accurate templates, so that I can build several at a time and scatter them around the property (along with all the bluebird nesting boxes and benchtables ;)

 ___________________________

In commenting on the Benchtable post, Karl suggested that I upload plans for the benchtable, so that they may spread throughout the Ozarks.  As it happens, I recently ran across a wonderful little drafting board while at Grizzly Industrial  in Springfield, Missouri.

Portable drafting board

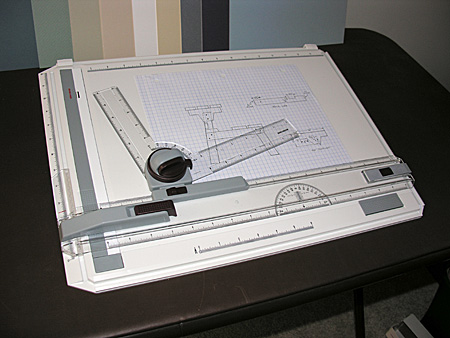
Now, once I brush up on my mechanical drafting skills, I’ll try to figure out how to post the plans on-line for those who may wish to build something in their spare time.

A Benchtable

Although my last blog post indicated that this current post was to be on the topic of barbed wire, that will have to wait, as I would rather show you my new benchtable (rhymes with vegetable), the latest project to emerge from my shop.

A picnic spot near the catfish pond

There are many locations around the property where Retta and I like to picnic, such as the woods behind the catfish pond.  Because we use this area to picnic regularly, we have “furnished” it with a fire ring,  a rehabilitated glider, and a picnic table.

Full-sized picnic table

This is the heavy, full-sized (8′ long) picnic table that I built a few years ago (note to self – picnic table needs a new coat of stain).  It is a sturdy table, and works just fine for a picnic, but as you surely know, picnic tables are not comfortable for sitting any length of time.  Hence the steel glider, which provides comfy seating for extended periods of leisurely reflection and conversation.  As Pablo, at Roundrock would surely agree, nice, comfy seating is a necessity for peace-of-mind and happiness here in the Ozarks.

Now, there are many locations (perhaps 20 or so) around the property where Retta and I like to stop and rest while on a hike, to simply sit and watch the grass growing under our feet, or the birds flying overhead.  But where to sit?  One needs a comfy seat to sit in (unless one likes to sit in the sometimes damp, sometimes tick-laden grass).

New benchtable

To provide comfy-seating around the property, I found construction plans for a wooden bench in a home-project book, and after altering some dimensions and angles to suit my tastes, built a prototype, which is pictured above.

The bench is made from treated “2 by” lumber, is six feet long, and is heavy enough that it will “stay put” in the winds that sometimes scream down the hollers of the Ozarks.  Most important, the dimensions and angle of the bench combine to create a very comfortable seat.

Rear view of benchtable

In this rear-view of the bench, you can see the stout (and rather unorthodox) supporting structure that forms the back of the bench.  Besides adding heft to the bench, this assembly allows the back of the bench to swivel up and lock in a horizontal position, which converts the bench to a picnic table.  And that is the real beauty of this bench design.  It is a bench, but it is also a table.  And so, I call it a “benchtable”.

The benchtable locked into “table” position

This photograph shows one of the bench back/table top support brackets.  The back/top pivots on the lower, fixed hex-bolt.  The upper bolt (without a nut) locks the top into position.  To restore the picnic table to it’s bench form, simply pull out the upper bolt and lower the back/top assembly.

Benchtable in “picnic” mode

Even though this opens to only what amounts to a picnic “half-table”,  it is sturdy and still provides room for a portable BBQ and a couple of hungry picnickers.

Now that I have built one prototype, I have identified a few little details that I want to change, and I will then get to work producing templates, so that I can easily duplicate the parts.  My goal is to build enough benchtables to place at strategic spots on the property so that Retta and I will have no excuse not to sit back and watch the grass grow.

Benchtable in “loafing” mode

:) As I am doing here :)

Devil’s Rope

Devil’s rope – an ominous sounding moniker.  But anyone who has worked with barbed wire will tell you that it is an appropriate term for this most unforgiving ranch fixture.  Devil’s rope (AKA barbed wire) will lash out at you at the least provocation.  It will lacerate your skin just as efficiently as it rips your new blue jeans to shreds.  Want to know if someone really lives on a farm or ranch?  Just look at their hands and arms for the telltale scars that come from working with this fiendish fencing material.  No scars apparent?  Urban cowboy.  Period.

 Short section of barbed wire fence needing repair

So you can appreciate the slight groan that escaped my lips as Retta informed me that a small section of barbed wire fence (seen above) needed repair.  This was a task that couldn’t wait, however.   This section of fencing keeps our horses within their grazing pasture, and out of our pond and nearby hayfield.  At best, barbed wire fencing is a safety concern around horses, but sagging, loose barbed wire is a disaster waiting to happen.  So off to work I went.

A makeshift wire caddy

I gathered up my small collection of barbed wire fencing tools to accomplish this repair chore.   Spools of barbed wire are both heavy and unwieldy, so it is helpful to use some type of caddy to facilitate handling the spools.  Commercial caddys are available at farm & ranch stores, but since I had two solid-rubber, spoked, ball-bearing wheels laying around, I fashioned a makeshift caddy using the surplus wheels, along with some scrap lumber and a couple of pieces of threaded rod.

A few fencing tools

The basic tools I use are seen in this photograph.  A bolt cutter will cut through wire, nails and fencing staples easily, so it is handy to have one on hand for repair work.

The t-post driver is a heavy tool that is used to pound t-post into the ground (you can see a picture of one in action in this previous post).  I cannot tell you exactly how much mine weighs, but I can describe a magical property that all t-post drivers possess – with each successive t-post that you install, the driver gets heavier.  It will get heavier and heavier, until you can’t lift it anymore!

The yellowish device is a wire stretcher, which allows the barbed wire to be drawn up tight and firm.  The small red-handled tool is called a fencing pliers, and is very handy to have in your pocket as you make repairs.  A spool of smooth wire can be utilized in a variety of ways, as can a good assortment of fencing staples (for trees and wooden posts) and t-post clips.

Last, but certainly not least – don’t forget a stout pair of leather gloves to help protect your hands from the thousands of sharp, cunning barbs that await you on the malicious spool of wire you are about to work with.

T-post puller

If you are careful about positioning your t-posts correctly before pounding them into the ground, you may never need to use the t-post extractor pictured above, however,  if you are like me, it will soon become a well-worn tool in your arsenal of fencing supplies.  It is a simple device that grips the nubs projecting from the t-post, and through the use of a fulcrum base, exerts tremendous upward pressure onto the t-post, thereby extracting it from the ground.  Now, you can re-position it and pound it back into the ground, where you should have put it in the first place :)

The reason I have chosen to ramble on about devil’s rope will become apparent with my next post, so check back soon…