A Nice Way to Kill Some Time

Cliff House Inn and Restaurant

A few day ago Retta and I had to leave her vehicle at the local Ford dealer for some maintenance, which was going to take a few hours for the dealership to complete.  We decided to kill the time by sightseeing in our local area, which took us south along Arkansas Scenic Byway 7, which is always a lovely and picturesque drive.

Because we hadn’t eaten anything prior to leaving the house, we thought it would be a fine idea to partake of breakfast at the Cliff House Inn, a well-known (among locals) diner located in a spectacular location along the scenic route. 

Cozy balcony overlooking the canyon

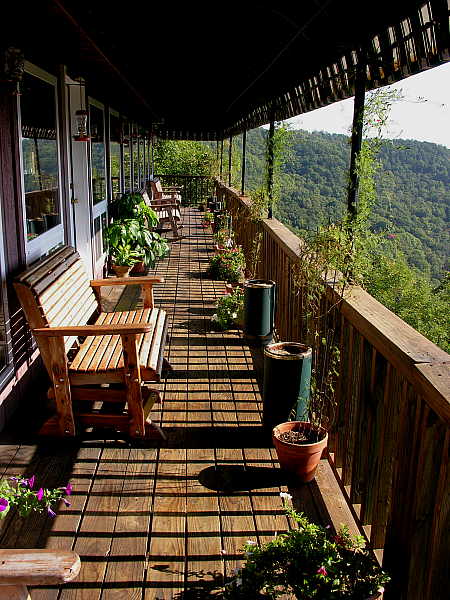
Besides good food at a fair price, the main draw of the Cliff House Inn is the view that can be seen from the dining room and from the casual balcony, shown in the photograph above.

Why travel all the way to Arizona?

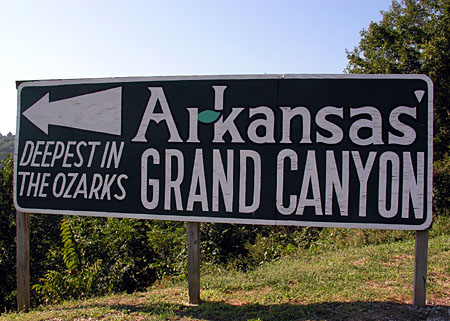
The Cliff House Inn overlooks a scenic canyon, which, according to the sign above, is the deepest canyon in the Ozarks.

Wonderful view from Cliff House Inn balcony

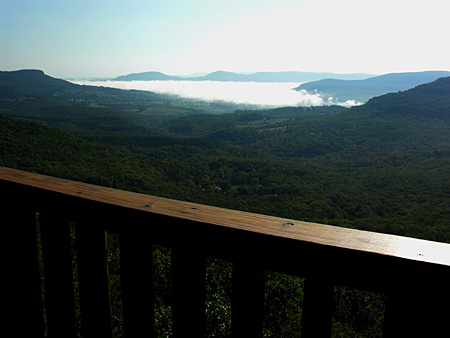
While this canyon certainly cannot compete with the Grand Canyon in scope and drama, it is still a beautiful and very delightful sight to view while savoring a meal at the Inn.  In the photograph above, you can see the view from the balcony on a day when a typical Ozarks fog bank filled the canyon.  By the time we had finished our breakfast, the fog had dissipated, offering a clear view of the surrounding hills and valleys (hollers, as they’re known around here).

Large geode for sale at Mystic Cavern gift shop

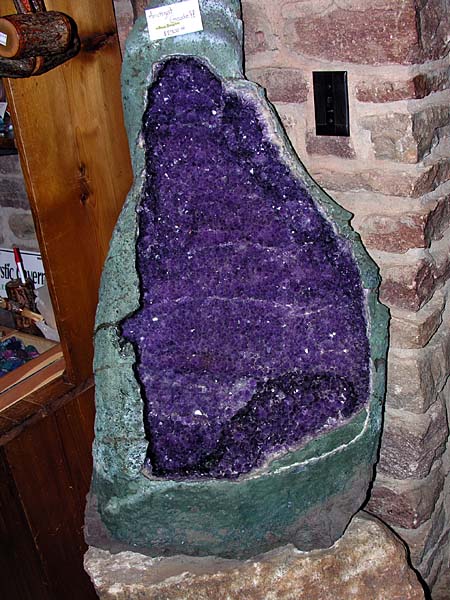
After breakfast at the Cliffhouse Inn we traveled back toward town.  Northern Arkansas is home to over 4700 identified caves, owing to the Swiss cheese-like geology of the schist formations that form the Ozarks.  Along the way we passed one of these caves, Mystic Cavern, which operates daily guided cave tours, and so we elected to kill some more time by taking a cavern tour.  As we waited for the guided tour to begin, we browsed the gift and rock shop on the premises, where we saw this amazingly large amethyst geode from Brazil (asking price – $2700).

Formations inside Mystic Cavern

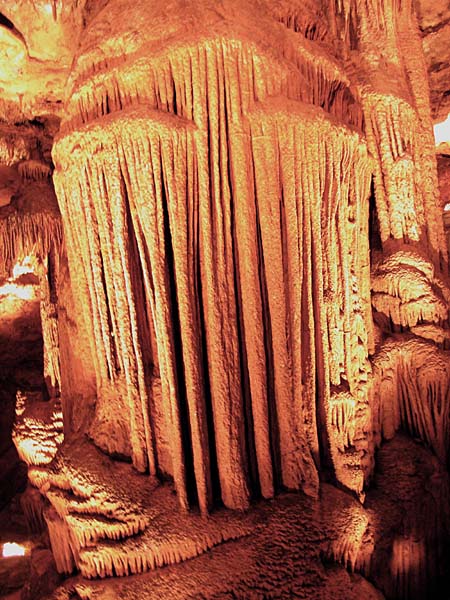
Inside Mystic Cavern you can see all of the various types of cave formations you would expect to see in such an environment.  It was well worth the time and minor effort involved for us to see this cavern.

Between breakfast at the Cliff House Inn and a tour of Mystic Cavern, we thought it was time to start heading back to town, but not without one more quick stop along the way.

Stopover at Buffalo National Scenic River

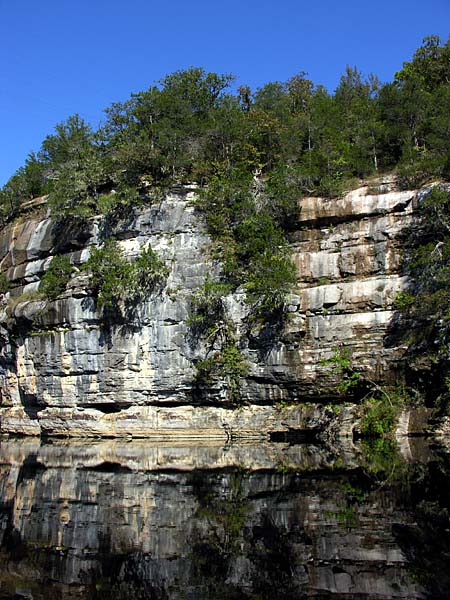
We would be crossing a section of the Buffalo National River, a scenic waterway administered by the U.S. National Park Service as the first U.S. National River.  The Buffalo River is a superb and popular river for float trips.  Besides the solitude and seclusion the river offers, the main draw is the pristine beauty of the crystal clear water gently flowing along cliffs and rock embankments like the one shown in the photograph above.  When the water is calm, it is hard to tell where the water begins and the rock ends.  We wouldn’t think of driving by the Buffalo River without stopping to take a look, which is exactly what we did before returning to town to pick up Retta’s vehicle from the dealership.

It is a very nice feeling knowing that we can enjoy such a wonderful and scenic day by just driving around the very area we choose to make our home.

A Head Shed?

Antler sheds found in fields

It is not unusual for me to find deer antler sheds around my fields and pastures, such as the ones pictured above.  I try to keep a sharp eye out for them in the fall, particularly when I am using the tractor to bush-hog our fields.  Why the sharp lookout?

Antler point extracted from tractor tire

In the photograph above there is a small tine from a deer antler that I keep on my desk.  It reminds me of the day I found it, lodged in the sidewall of a perfectly good rear tractor tire.  Seeing as this tine cost me about $400.00, I figure that it can at least serve as a paper weight for a short period of penitence.

A running gag

We find the sheds so often that I thought I would begin to mount them and display them on a wall.  I was in Bass Pro Shop in Springfield, Missouri about 5 years ago, when I saw an antler mounting kit for sale at a reasonable price.  I bought one, and soon had a pair of shed antlers proudly on display above my office desk, as you can see in the photograph above.

Something looked peculiar with the antlers I had hanging on the wall, but I couldn’t quite put my finger on what it might be.  Then, one day as I was browsing through some deer photographs, it dawned on me – the antlers hanging on my wall looked odd because I had mounted them upside down!

Oops!  I was about to climb up on my desk to retrieve the plaque with the mis-mounted antlers, when it occurred to me that it might be fun to leave them as they were, and see how long it would take until somebody noticed the error in my faulty craftsmanship.  To date (about 5 years now) no one has said a thing.  I wonder how long this streak will run?

This mistake could have been avoided if only the antlers appeared in my pastures and fields just like the ones I found today –

Today’s find while doing groundskeeping chores

I ran across this specimen as I was performing a few grounds keeping chores today.  You can clearly see the correct orientation of the antlers relative to the skull on this young buck.  There is no way even a dummy like me could botch this up ;)

Teeth are still sharp

I am surmising that this buck was relatively young, as there were no missing teeth, and the teeth looked to be sharp and undamaged.  Various other skeletal remains were located in the vicinity of this skull.  Perhaps he was brought down by a pack of coyotes, and then the carcass picked clean by vultures and other critters.

Bluebird Trail – Part II

First batch of bluebird nesting boxes

Perhaps you recall from a previous post that I intend to establish a bluebird nesting box trail along some of the trails on our property.  Since that posting, I have made substantial progress in my commitment to build 100 bluebird nesting boxes.  As you can see from the photograph above, I have completed 25 of the boxes.  You can also see that the boxes take up a good deal of room in the shop, which is why I decided to build the boxes 25 at a time.

In all crafts, the rule of thumb is to measure twice, and cut once, thus avoiding errors and material wastage.  In the design of the nesting box that I am using, there are 30 specific measurements that are required in order to build the box.  The measure twice rule thus makes  60 measurements per box.    Since I am building 100 boxes, a total of 6000 accurate measurements are required.  UNLESS…..

Bluebird nesting box patterns and jigs

UNLESS I were to spend a little bit of time up front to build an accurate set of templates and jigs for this project, which is what you see in the photograph above.  After the initial templates are built, the tape measures and rulers can be put aside, and the parts for the 100 bluebird nesting boxes can be build with complete accuracy and no wastage.

Patterns provide accurate hole placement

By providing holes in the templates where all the screw pilot holes need to be located, it is a simple matter to use an awl (shown above) to mark accurate drilling locations for each hole.

Miter table setup templates

Besides cutting and drilling templates, I made and labeled a complete set of jigs and stop blocks to use on the table saw, one of which is shown in the photograph above.  Now, without any measuring at all, I can easily set up the machine to make the accurate and uniform cuts I need for this project.

Drill press setup for hole saw

Building the nesting boxes in batches allows me to produce all the parts I require for the project with a minimum of machine set up time.  For example, in the photograph above you can see that I am using a 1 1/2″ diameter hole saw to cut the entry hole for the nesting box.  Using this hole saw requires the drill press to be set to a slower speed than for the other drilling on the boxes.  Instead of changing the machine speed (which involves realigning two drive belts) repeatedly for each nesting box, I can simply set the machine up once and drill all the 1 1/2″ holes at the same time.

Assembly jig

The assembly phase of the project is made simple by the use of a couple of assembly jigs that I fashioned for this project.  By building reusable positioning blocks and jigs, I can position parts accurately for fastening with screws, knowing that each screw is located exactly where I want it to be.

Setting the t-post into the ground

The completed nesting boxes are now ready to be installed in the field.  I think steel t-posts are the quickest and most durable method for mounting the nesting boxes.  The photo above shows how simple it is to put a t-post into the ground, using a t-post driver made for just this job.

Nesting box attached to t-post with conduit straps

After the t-post is in the ground, it is time to mount the nesting box on top of it.  In the photo above you can see that two 1 1/4″ conduit straps work as perfect fasteners for the nesting boxes to be secured to the t-posts.

Installed bluebird nesting box

And here is the finished product.  Now, just 99 more to go ……